Website basics: click here.
Setting up your website: click here.
Your blog: click here.
Monday, September 27, 2010
Website basics
Why a website? As an author, you have to have a home base, a site that provides information about:
- you
- your writing
- the events that you're a part of
- how to contact you, your agent and/or publisher
- (if you chose) your blog
- (if you chose) information for book clubs
Controlling your website
It's best to have a site you can update yourself (rather than paying someone to change a comma, for example).
It's best to have a site you can update yourself (rather than paying someone to change a comma, for example).
This is easily done now by using sites such as Blogger or WordPress, which are free. (See the post below—"Setting up a Website"—to see how this is done.)
You can do it yourself, but you can also hire a designer to set one up for you. A 5-page site such as I'm suggesting might run $600 - $700.
Should you have a website for yourself and/or for your book?
If you have more than one book published, I think you have to have one for yourself. And then, you could also have sites for your books.
If you have more than one book published, I think you have to have one for yourself. And then, you could also have sites for your books.
Some amazing websites have been created about the world of a book.
Another amazing book website for The Horse That Leaps Through Clouds incorporates the research done for each chapter: http://horsethatleaps.com/
Both of these have clearly been professionally designed. Some authors persuade their publishers to share the cost. In most cases, however, it comes out of the author's pocket.
Your personal website would then include links to websites for each of your books.
Get your domain name address (i.e. www.yourname.com)
You have to pay an annual fee for this: it's rather like renting your URL, your spot on the Net.
You have to pay an annual fee for this: it's rather like renting your URL, your spot on the Net.
There are many companies that do this (Google "domain name provider"). I use Domains at Cost. Because it's so important, I've set it to renew automatically every year.
Once you have one, hire a Tech Wiz to have your domain name be the URL address connect to your Blogger or WordPress website.
Sunday, September 26, 2010
Setting up your website
Use Blogger or WordPress to set up your site

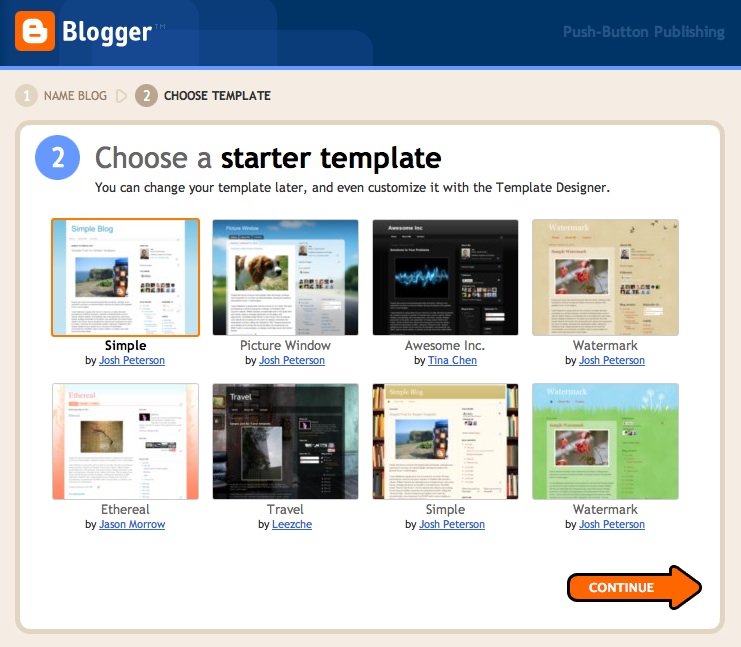
Decide on a design.

Both are free. Blogger (shown here) is easier, but sometime clunky. WordPress, I'm told, has more finesse. They basically work in the same way.
1. Choose a name for your website. Give this some thought before you jump in. The site will tell you if the address is available.
1. Choose a name for your website. Give this some thought before you jump in. The site will tell you if the address is available.
Whenever possible, use your name. You are your brand. If someone else has your name, add something to it (for example: authorJoanSmith).
Note: if you have a domain name (JoanSmith.com), you will be able to use it for your website address. I suggest hiring a Tech Wizz to do this.

Decide on a design.
Keep it simple in both design and content. Keep in mind that dark backgrounds are hard to read.
Click on the Design tab.
- Note the things other authors have on their websites and blogs.
- Experiment with widgets.
Add pages:
- Click "Edit Pages."
- Add pages. Here are the basic pages (i.e. tabs) you should include:
Home page (a page for headlines and links to all the other pages)Your biographyYour booksYour blog (if you have one)EventsContacts: how to contact you (to be put on a newsletter mailing list, for example, or give a reading), your agent, your publicist...)Some authors profit from having a page specifically for book clubs.
Play and explore.
Get used to how the site works before you go public. To make it private:
- Click the Settings tab.
- Click "only blog author."
- Be sure to change this to "anyone" when you are ready to go public.
Saturday, September 25, 2010
Your blog
Note: If you have already set up a website with Blogger or WordPress, then a page on your website should be your blog.
Decide on a focus or theme
Choose something you want to write about regularly, something that excites you and nourishes your work.
Setting it up
1. Choose a name for your blog. Give this some thought before you jump in.
2. Choose your website address. The site will tell you if the address is available.

8. Link to blogs you read, books you like, websites of authors you like. Lists of links are called a Blog Roll.
Decide on a focus or theme
Choose something you want to write about regularly, something that excites you and nourishes your work.
Setting it up
1. Choose a name for your blog. Give this some thought before you jump in.
2. Choose your website address. The site will tell you if the address is available.
Whenever possible, use your name. You are your brand.
If someone else has grabbed your name, add something to it (for example: authorJoanSmith).
Note: if you have a domain name (JoanSmith.com), you will be able to use it for your blog. This, however, is beyond the Luddite level. I, personally, would hire a Tech Wizz to do this.Start blogging
Make the name of your post catchy: it might be the only thing that gets read.
Keep your blog essays (called "posts") short.
Headings in bold help break up the space. (Readers skim when on computer.)

Add visuals. They will need to be in a JPEG format. You can use a photo on your own computer or one on the Net (so long as it's in the public domaine).
To take an image off the Net: "Control-click" an image on the Net and save to JPEG.
If that doesn't work, use an image clipping software. As a Mac user, I like Grab, but there are many others.
To add a video off YouTube, click on <embed> in the lower right hand corner. Copy the code that comes up. Go to the "Edit HTML" tab (upper right above). Scroll down to where you want the video to appear. Paste in the code:
I just did this for this wonderful TED talk by Elizabeth Gilbert, author of Eat, Pray, Love. It didn't show up until I pressed "publish post," and then there it was.
Try to post regularly, but not at the cost of the quality of your posts. Offer something: tips, links to good blogs, book reviews ... your book even. Be generous.7. Always respond to comments—unless it's spam, of course. You will have control over what comments are published. (Comments will be emailed to you for approval.) Take care how you respond: comments cannot be edited once posted.
8. Link to blogs you read, books you like, websites of authors you like. Lists of links are called a Blog Roll.
Subscribe to:
Posts (Atom)